Salesforce Integration Guide
Last updated: October 30, 2025
Amplemarket’s Integration with Salesforce is designed to be an API 2-way integration. Below is what we can push and pull.
Push | Pull |
Objects (such as leads, contacts, accounts) that were enrolled into sequences in Amplemarket and any data associated with them | Objects (such as leads, contacts, accounts) to add to your exclusion list in Amplemarket |
Activities (emails, calls, linkedin, and meetings) | Existing Accounts + owners to use for prospecting |
Engagement results / activity (such as reply, open, and meeting metrics) | Lists (upon push from Salesforce) of contacts / leads |
Setup Videos
Setup Walkthrough
In order to complete the following steps, you must have an admin seat or a seat with the following permissions:-
Read/Created/Edit on the Standard Objects
Accounts
Contacts
Leads
Tasks (Delete Task Permisison required too)
Opportunities
From Administrative Permissions
API Enabled
View Setup and Configuration (used to see API quota limits)
Run Reports
View Reports in Public Folders
Edit Tasks Permissions
Manage Reports in Public Folders
Step 1: Connecting Salesforce
Log into Amplemarket and click “Settings”
Navigate to "Integrations", then select "Salesforce CRM Integration". Click "Connect Salesforce".
This will then take you to a Salesforce login page where you can enter credentials and establish the connection.
Starting in September 2025, Salesforce restricted the use of uninstalled connected apps, which can prevent integration users from connecting to Amplemarket.
Solution for Integration Users:
If you're using an Integration User license to connect Salesforce:
Go to Salesforce Setup → Connected Apps OAuth Usage
Find Amplemarket in the list
Click "Install" for Amplemarket
You should now be able to complete the connection
Step 2: Configuring Pull Records
Loom tutorial for this step can be found here
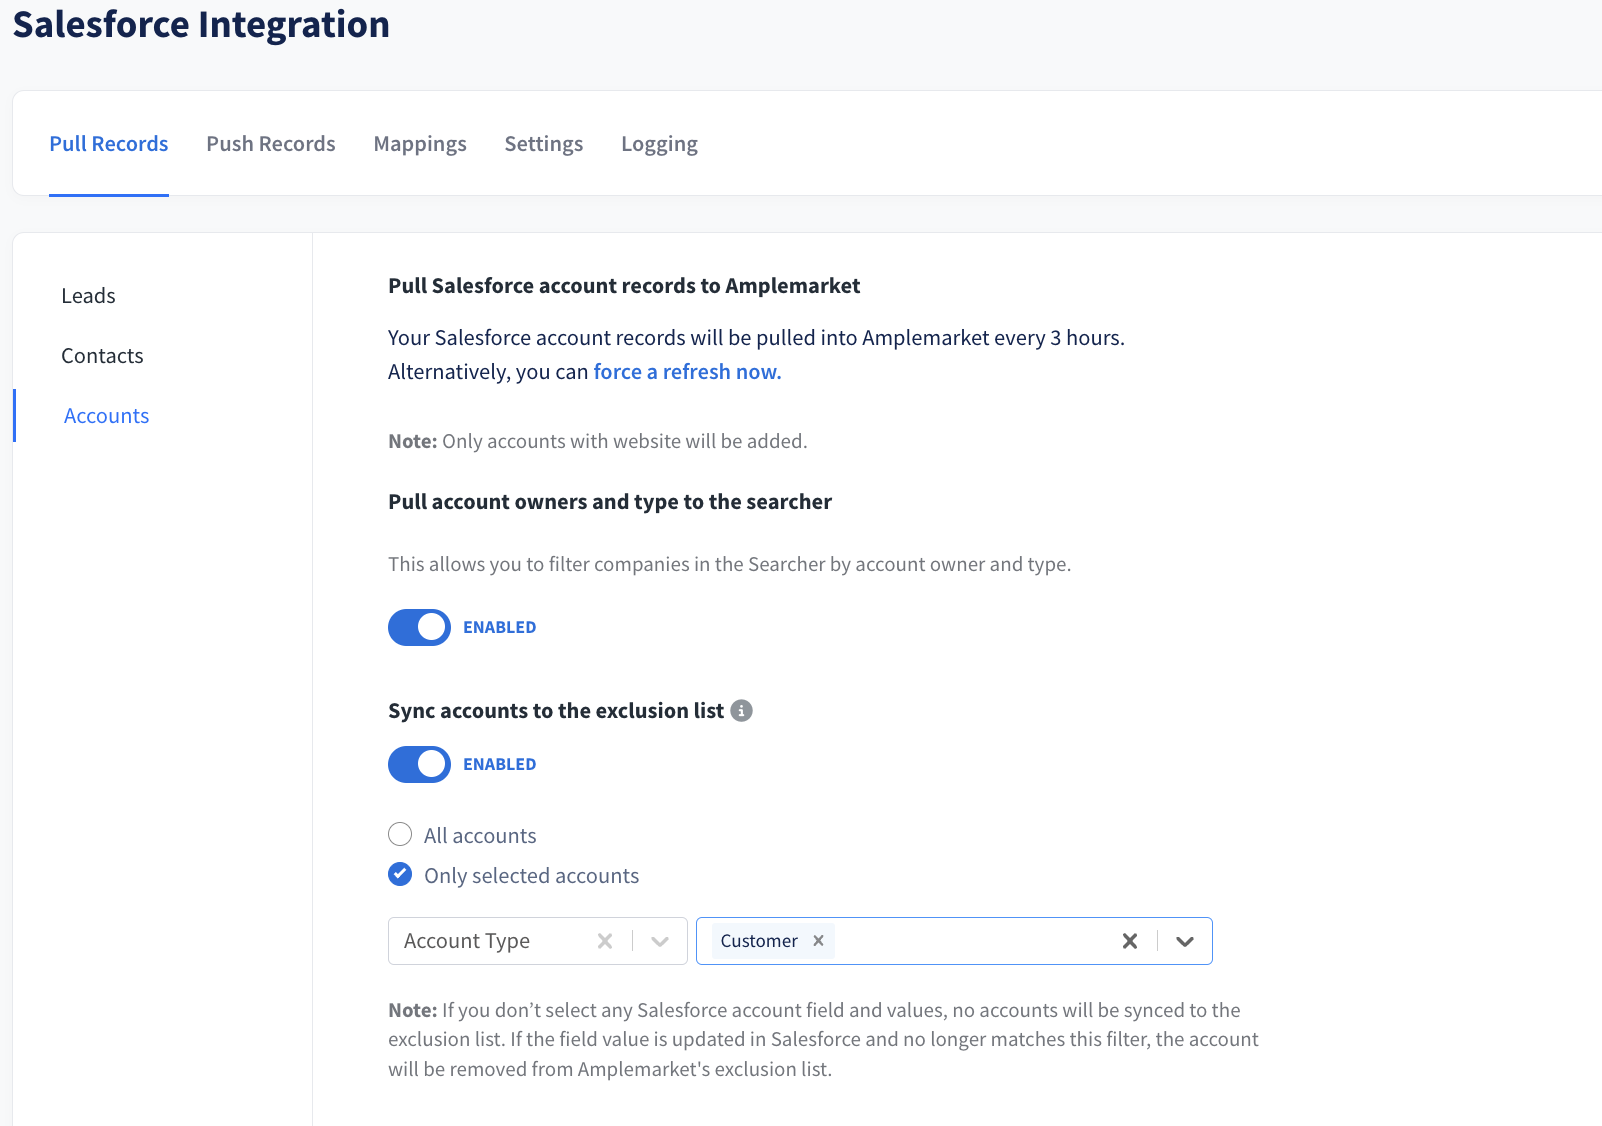
You can pull 3 types of records from Salesforce directly to your Amplemarket exclusion list:
Leads (based on email address matching)
Contacts (based on email address matching)
Accounts (based on website domain matching)
To set this up:
Select the object on the left hand side you wish to set up exclusions for
Select “Only selected ______”
Pick the Salesforce field to be used and the option you wish to exclude
Repeat as needed for other objects
Step 3: Configuring Push Records for Contacts or Leads
Full loom tutorial on this step found here
New leads generated through Amplemarket can be pushed to your Salesforce automatically once enrolled in a sequence.
To Set this up:
Enable the toggle for the push under the “Push Records Tab
Decide on pushing as Contact or Lead
Decide on pushing all contacts enrolled into sequences, or only those who reply with certain labels

Note: If Contacts, you will also have to decide:
Associate all the new Contacts to existing Salesforce Accounts
If a lead already exists, do you wish to convert it to a contact, or keep it as a lead
For either contacts or leads, Amplemarket will automatically include a source field populated by whatever you enter in the source text field. The default is Amplemarket, but you can change this. Please make sure to match this field with one on your Source Picklist in Salesforce, or make a new option to match.
If you make any changes to your integration, and you wish to backfill, you can always select to “Push History” button.
Step 4: Configuring Activity Push
A full loom tutorial on this step can be found here
You can enable Amplemarket to log all activity (call, email, linkedin) done in the system. This activity will log under the object itself (lead/contact) in Salesforce.
To set this up:
Review the default toggles that the Integration enables
Toggle on or off any options that match your preference
To help you search and filter activities within Salesforce, we recommend enabling Activity Title Enrichment. The additional information includes the sequence name, sequence stage, sequence type, and all the tags that were configured for the sequence where that specific activity occurred.
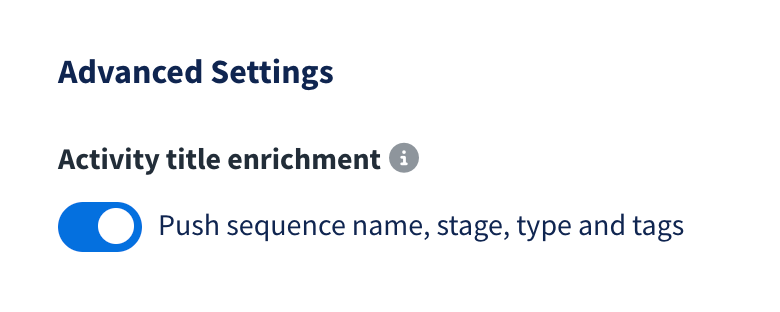
Note: Salesforce limits the number of characters on Activity Titles to 255 characters. This means that some information might not appear.
Note 2: In order for in-sequence e-mails to be pushed to Salesforce, "Push Lead/Contact Records" must be enabled. Otherwise, only external e-mails, calls and calendar events will be pushed to already existing records, which are matched via e-mail address.

What "Push phone calls placed via 3rd party dialers" does
This setting controls whether phone calls made through third-party dialer services (external to Amplemarket's built-in dialer) are automatically synced to your CRM systems (Salesforce and HubSpot).
These are external dialer services that integrate with Amplemarket but aren't Amplemarket's native dialer
Examples include: Salesfinity, Trellus, and CRM dialer integrations
How it works:
When enabled: Phone calls made through third-party dialers will be automatically pushed to your connected CRM systems (Salesforce/HubSpot) as call activities or tasks
When disabled: These external calls will be logged in Amplemarket but won't be synced to your CRM
The setting is separate from:
"Push phone calls placed with Amplemarket Dialer" - which controls calls made through Amplemarket's native dialer
Both settings can be enabled/disabled independently
What gets synced:
Call details (date, duration, direction, disposition)
Call notes and recordings (if available)
Contact/lead association
Call outcomes and dispositions
Use case:
This is useful if your team uses multiple dialer tools but wants all call activity consolidated in your CRM. For example, if some team members prefer using Salesfinity or another dialer service, enabling this setting ensures those calls still appear in your Salesforce or HubSpot activity history.
Note 1 : In order for in-sequence e-mails to be pushed to Salesforce, "Push Lead/Contact Records" must be enabled. Otherwise, only external e-mails, calls and calendar events will be pushed to already existing records, which are matched via e-mail address.
Note 2: Isolated calls that are made outside of a sequence, are still pushed to Hubspot as long as there is an existing contact linked to it in Amplemarket.
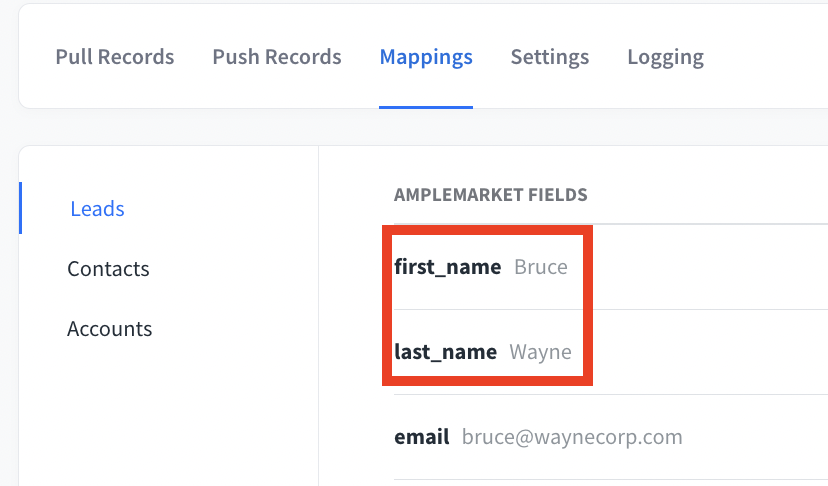
Step 5: Configuring Mapping Fields
Complete mappings tutorial found here
In this section, you can configure all the fields you want to sync between Amplemarket and Salesforce records. You can choose field mapping for Leads, Contacts, and Accounts.
This allows you to set up the mappings once and sync them to Salesforce according to the rules you defined when setting up your pipeline.
For example, for each Lead on Salesforce you can:
See what is the name of the field on Amplemarket
Decide what is the default value on Salesforce if the field is empty
Decide if you want to overwrite the data on Salesforce with the information pushed from Amplemarket
Decide if you want to make this field optional, which means it won't prevent the lead/contact/company from being updated/created if there is an error in this field (e.g., error in the format, validation rule, etc.)
Pro tip: For many fields and errors, the optional check box will be a lifesaver. Optional will allow the contact/lead to push over despite an error. E.G., we highly recommend that all locations (state, city, country) be set as “optional” as these frequently populate picklists. If the value Amplemarket has does not match your pick list, it will cause an error and block the whole contact/lead. Setting this as optional leaves this value off and proceeds as usual. Typically, this happens with state/providence when you are prospecting in the EU, etc.
Important: Dependent Picklists Configuration
If you're using dependent picklists in Salesforce (where one picklist's available values depend on another field's selection), you must ensure proper configuration to avoid push errors.
Common Error:INVALID_OR_NULL_FOR_RESTRICTED_PICKLIST: bad value for restricted picklist field
To resolve dependent picklist issues:
Go to Salesforce Setup → Object Manager → Lead (or Contact/Account)
Click Fields & Relationships → Find your controlling picklist field
Click Field Dependencies
In the dependency matrix, ensure that your Amplemarket values are enabled for ALL controlling picklist values that might be used
This is especially important when pushing to existing leads that may have different LeadSource values than your default mapping configuration.